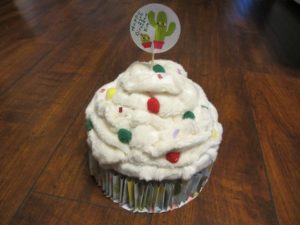
Cupcake Altered Tin Pin Cushion
Supplies:
- One round tin
- Minky fabric: 1/8 yard of cream colored
- Round balls of trim in different colors
- Glue gun, glue sticks
- Silk ribbon in different colors
- Two 12 x12 sheets of paper for cupcake wrapper
- One small styrofoam cone
- And one birthday topper (optional)
- Cut minky fabric in half, in a bag. It helps with the mess.
2. Remove as much of the mess as possible in the bag.
3. sew wrong sides together; right sides out.
4. Glue Minky fabric on sides of the can first. Don’t make it smooth you want it to look like frosting over the edge of a cupcake.
5. Start gluing the first row to the center of the can.
6. Cut bottom 2/3 off of Styrofoam cone.
7. Glue the bottom of the cone to the middle of the tin. I used the bottom of the cone instead of the top. I thought it looked better.
8. Continue to glue the Minky fabric around the center Styrofoam until it looks like a frosted cup cake.
9. Cut round colored balls from trim and place around, glue into place.
10. Cut pieces of silk ribbon in different colors for sprinkles. Glue into place.
11. Measure height of can, minus the lip.
12. Cut paper in strips a little wider than your can.
13. Fold paper in accordion style; back and forth. My small can took four strips of paper folded.
14. Glue strips of paper together.
15. Glue paper to outside of can.
16. On second piece of paper, trace the bottom of can with the folded paper on the sides.
17. Lastly, cut out the paper circle and glue to the bottom of the can to finish up with the cup cake wrapper.

Check out some of my other altered tins: